


Orchids are the perfect plant for many people’s homes – they are durable, easy to look after, and add some stylish flair to your space.
But, like all plants, there may come a time when your orchid’s roots are too big for their pot. When this happens, you need to repot.
Knowing when to repot or transplant your orchid can be a skill in itself. Keep reading to find out everything you need to know about orchid transplantation to make your next repotting session stress-free.
When Should I Repot My Orchid?
While you may not see a lot of growth from your orchid year-on-year, there is always some growth going on under the soil.
When your orchid’s roots get too cramped, the health of your orchid will be quickly impacted. This is because your plant is reliant on the roots for water and some other nutrients that are essential for all living plants.
With this in mind, it is recommended that you repot every year. The best time to repot is usually after the flowers have gone back, just as new growth is becoming noticeable.
However, there are some other signs that a quick repot is needed for your orchid:
If you see that your orchid’s roots are soft, mushy, and brown you need to repot. This is a sign that you have left your plant alone for far too long, and you have been watering too much, too often.
Repotting now will help get your plant back to a happy and healthy place and the change of soil will provide some nutrients that your plant desperately needs.
Similarly, yellow foliage or blue growth are visual signals that your orchid is struggling and needs to be repotted.
You need to repot if you notice that your orchid’s roots are very tightly wound. Keep in mind that it is normal for some species of orchid to have slightly knotted roots, but if you notice tight knots or a lot more of them you need to help your orchid out a bit.
Plants need room to breathe too! Repot now and again next year with fresh potting medium – you may find that you need a bigger pot to make sure you have enough room for all the roots.
Repotting into a larger pot will be necessary if your orchid is growing over the pot’s edge. A too-tight pot will encourage your plant’s roots to become pot-bound.
How long has it been since you last repotted? You do need to make sure that you repot fairly regularly. So, if it has been more than two years since you last did this chore, make sure you change the pot soon!
Not only does your orchid need more space for its roots, but all the nutrients from the potting medium will have gone after 12 months-time for an injection of nutrients!
How Do I Repot My Orchid?
Time to repot? Follow these steps for success every time.
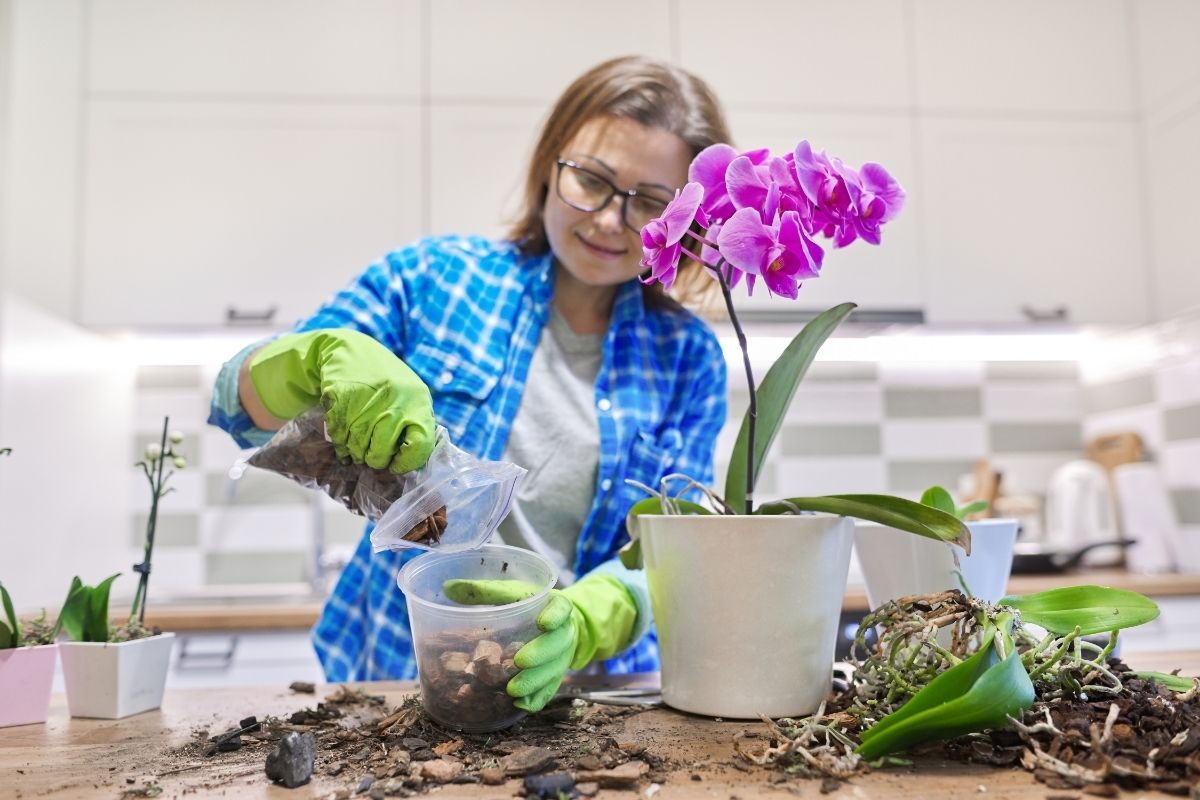
- First, you need to find the best potting medium for your orchid. We recommend Epsoma as it is a good combination of bark and charcoal – ideal for healthy orchids.
- You need to let your chosen potting medium soak in water for around 24 hours before you use it. This gives the potting medium ample time to absorb all the water it will need to keep your orchid well nourished. Be sure to let the potting medium drain before using it as excess water may encourage root rot or drown your orchid.
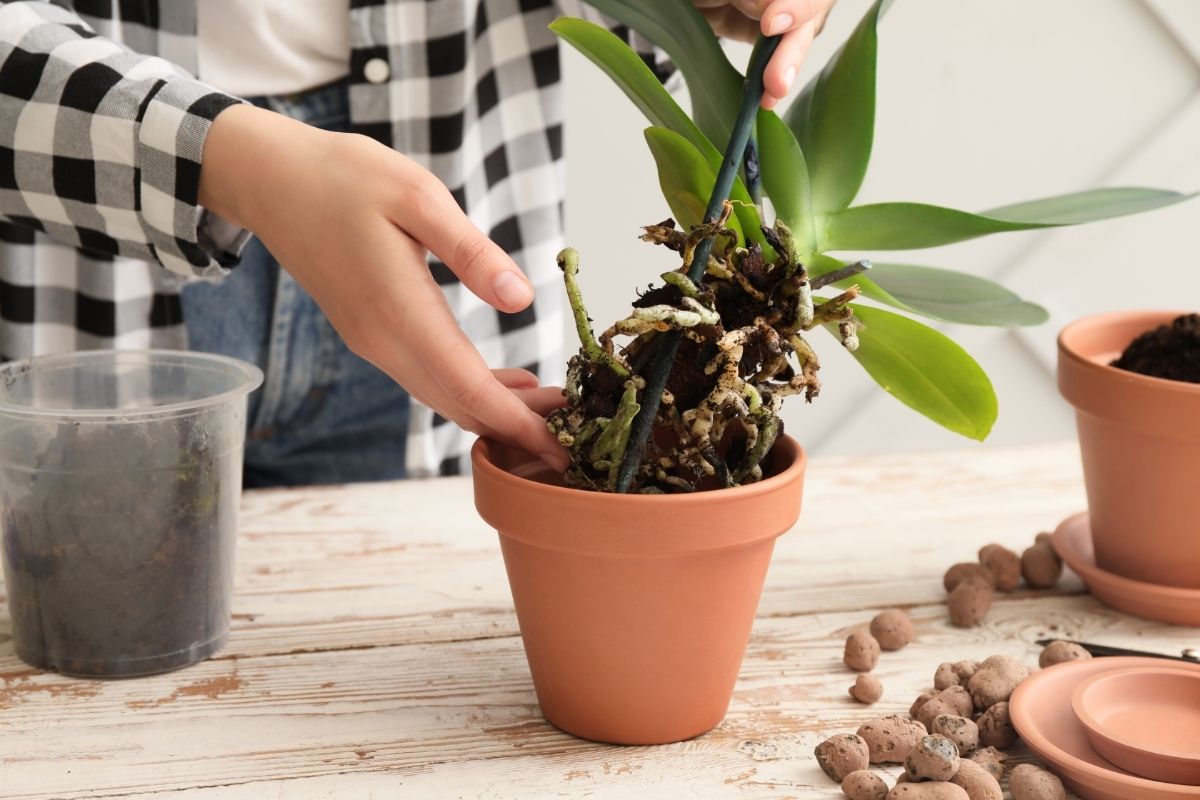
- Gently remove your orchid from its pot. You need to move carefully to avoid damage to the roots or stem of your plant. Take this opportunity to trim away any dead roots that you spot. Healthy roots are white and do not smell – any dark areas with a detectable odor need to be taken off.
- Fill up the new pot with your chosen orchid mix. Put enough in so that the bottom is covered by a decent layer, but the layer is not so deep that you can’t fit the root ball in. Filling up to one-third is usually recommended.
- Place your orchid into the pot. A single stem plant needs to be placed into the center of the pot. An orchid with more than one stem may be better off placed closer to the sides of the pot.
- Cover the root ball with the potting mix and carry on filling up the pot until the soil level is just below the rim.
- Stake your orchid if necessary for stability and then water thoroughly. You may need to add some more potting mix as it settles around your plant after watering.
- Continue to care for your orchid as normal.
How Do I Care For My Orchid?
So now you have repotted, how do you care for your orchid plant? There is no need to worry – orchids are super easy to care for when you understand the basics! The one key thing that you need to remember is that your orchid is not like other potted houseplants.
Related: Giving Your Orchid a New Home: How to Repot an Orchid
But what do you do to keep your orchid healthy?
Foremost, remember that you do not need to water your orchid often. Watering more than once a week will be detrimental to your plant, and you will probably develop root rot quite quickly. A teaspoon or two once a week is enough to keep a typical single stem orchid happy.
While orchids do not like being watered a lot, they do flourish in areas with high humidity – they are jumble plants, after all! You can recreate some jungle-like environments by putting your orchid on a drip tray, or investing in a humidifier for your orchid room.
You do, however, need to find a balance between humidity and air circulation. We recommend that you put your orchid on top of a decent-size humidity tray with some flare stones or inverted saucers. This will give your orchid humidity but keep it out of stagnant water.
Weekly orchid feedings with some specialist orchid fertilizer are also recommended. This will make sure that your plant always has enough nutrients to grow healthy and gorgeous flowers.
Remember that your plant comes from the jungle – it needs sunlight! But it is also sensitive – don’t give your plant too much sun! Place your orchid on a bright windowsill, ideally one that faces east or west.
This will give your plant the perfect amount of sunlight in the early morning as the sun rises, or in the late afternoon as the sun sets.
Quick Tips
- Orchids are particularly susceptible to germs and disease, so you need to be careful when you expose your roots out of the soil.
- Dilute some bleach in water and soak your new pot and any tools that you will use, rinsing well before use.
- Make sure you use sharp and clean shears to remove any dead roots. This will prevent damage.
- You may find it difficult to distribute the potting medium over your orchid. Using a chopstick to gently push pieces in between your orchid’s roots may be helpful.
- Create a humid environment for your orchid with a drip tray, humidifier, or by spritzing on water.
- Use collected rainwater to create humidity as much as possible – this will have a lower mineral content than tap water, meaning it will not leave white marks on the leaves or petals.
Final Thoughts
Follow these steps next time you need to repot your orchid. Thankfully, this is a fairly simple process that is just about guaranteed to bring new life to your plant.
It is best to repot your orchid every year or whenever your plant looks like it is struggling in its pot. Don’t be fooled by its slow nature – your orchid is still growing even if you don’t notice any changes from week to week.
Editor’s Recommendations
19 Different Types Of Brown Plants (Including Photos)
